How to Wire a Fire Alarm System: A Step-by-Step Guide

Installing a fire alarm system is vital for ensuring the safety of any building, whether it's a residential home, commercial property or industrial site. Proper wiring is important for the system to function correctly. In this article, we'll provide a comprehensive guide on how to wire a fire alarm system, ensuring you stay compliant with regulations and enhance the safety of your environment.
Understanding Fire Alarm Systems
Before diving into the wiring process, it’s essential to understand the components that make up a fire alarm system. The main elements include:
- Fire Control Panel: The brain of the fire alarm system that processes signals from detectors & periphery devices.
- Smoke Detectors: Devices that sense smoke or heat to trigger the alarm.
- Manual Pull Stations/Manual call point: Allow occupants to activate the alarm manually.
- Notification Devices: Sirens, bells, or strobe lights that alert occupants of fire or potential danger.
- Wiring cables: Connects all devices, ensuring relay of information & effective communication.
Tools and Materials Needed
Before starting your installation, have all the fire alarm devices, materials & tools ready:
- Fire alarm control panel
- Manual pull stations/Manual call point
- Smoke detectors
- Notification devices/Sounder
- 18-gauge fire alarm cable (or as required by your national/local code)
- Wire connectors
- Screwdrivers
- Drill & bits
- Electrical tape
- Multimeter
Step-by-Step Alarm Wiring Guide
Step 1: Plan Your Layout
Begin by planning the layout of the fire alarm system. This involves deciding the placement for smoke detectors, notification devices, and manual pull stations. Ensure that detectors are installed according to the National Fire Protection Association (NFPA) or European Standard guidelines and local codes, typically near sleeping areas and common spaces.
Step 2: Turn Off Power
Before you start wiring, make sure all powers are turned off to avoid any electrical hazards. This is a critical safety precaution to protect both yourself and the equipment.
Step 3: Install the Control Panel
Choose a central location for the fire alarm control panel, usually near an electrical source. Mount the control panel according to the manufacturer's instructions, ensuring it is easily accessible for maintenance.
Step 4: Run the Wiring
Use 18-gauge fire alarm cable to connect all components. Follow these guidelines:
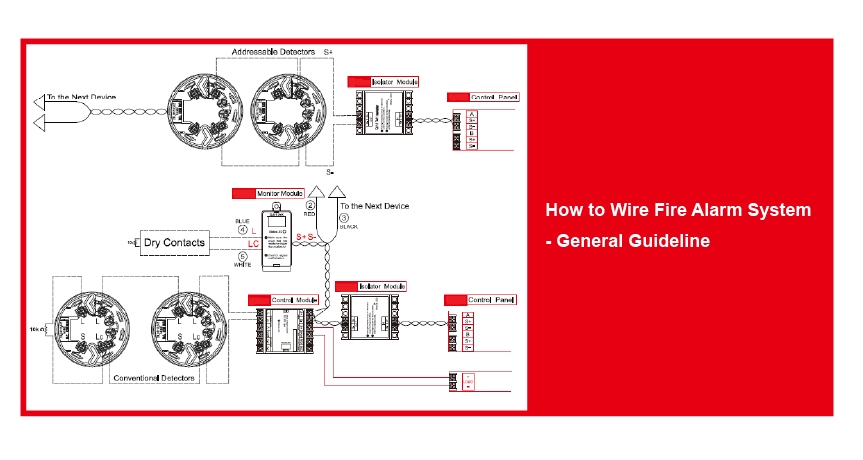
- From the Control Panel to the Detectors & accessories: Run the wiring from the control panel to each smoke detector device & accessories. Ensure the wiring path is tidy and organized, without sharp bends or kinks that could affect transmission.
- Series or Parallel Wiring: Connect detectors in a loop (series) or in parallel, depending on conventional or addressable types. Check with the Manufacturer’s specification for detailed guideline.
Step 5: Install the Smoke Detectors
Connect the wiring to the smoke detectors, adhering to the polarity indicated on the back of the devices. Most smoke detectors will have a positive and a negative terminal. Use wire connectors to secure the connections and wrap them with electrical tape for added insulation.
Step 6: Install Manual Pull Stations
Manual pull stations/manual call points should be installed near exits and in common areas where they can be easily accessible and in plain view. Use the same wiring procedure as with the smoke detectors, confirming they are connected to the fire alarm control panel.
Step 7: Install Notification Devices
Position notification devices/sounders at strategic locations to ensure they can be heard throughout the building. Connect these devices back to the control panel using the same fire alarm cable.
Step 8: Test the System
Once all components are wired, turn on the power and test the fire alarm system by pressing the test button on the panel. Use a multimeter to check voltage levels and check everything is functioning properly. Run a series of tests by activating random smoke detectors and manual pull stations to confirm that the alarm detection, notification & warning alert are operate correctly.
Step 9: Final Inspection
After testing, conduct a final inspection of your installation. Use a checklist to confirm that all wiring is secure, components and devices are mounted correctly, and there are no loose connections.
Conclusion
Wiring a fire alarm system can be a straightforward process if you follow the right steps. Always prioritize safety and compliance with local codes. Carefully read the manufacturer’s user manual & guideline for detailed instructions. If there are any uncertainty or if the system is complex, consider hiring a professional to do the installation.
For any product inquiry or development projects, please contact one of our specialists for more information.

